Thank you for choosing 3D Powder Hub™ as your online distribution center. Before proceeding, please note, if you have any question whether it’s regarding the processes throughout this guide or any other function on the website, be sure to contact us through email at admin@3dpowderhub.com or through the Live Chat feature on our website and we will be happy to assist you. If you decide to proceed, you agree that you have read both the Privacy Policy as well as the Terms and Conditions and agree with everything outlined in them.
Your Supplier Account – A quick overlook
Media Manager
Product Page Overview
Simple vs. Variable Product
Adding a Simple Product
Adding a Variable Product
Product Management
Order Listings
Viewing Single Orders
Order Status
Payments
Refund
Store
Location
Payment
SEO (Optional)
Customer Support (Optional)
Sales Reports
Contents
Your Supplier Account – A quick overlook
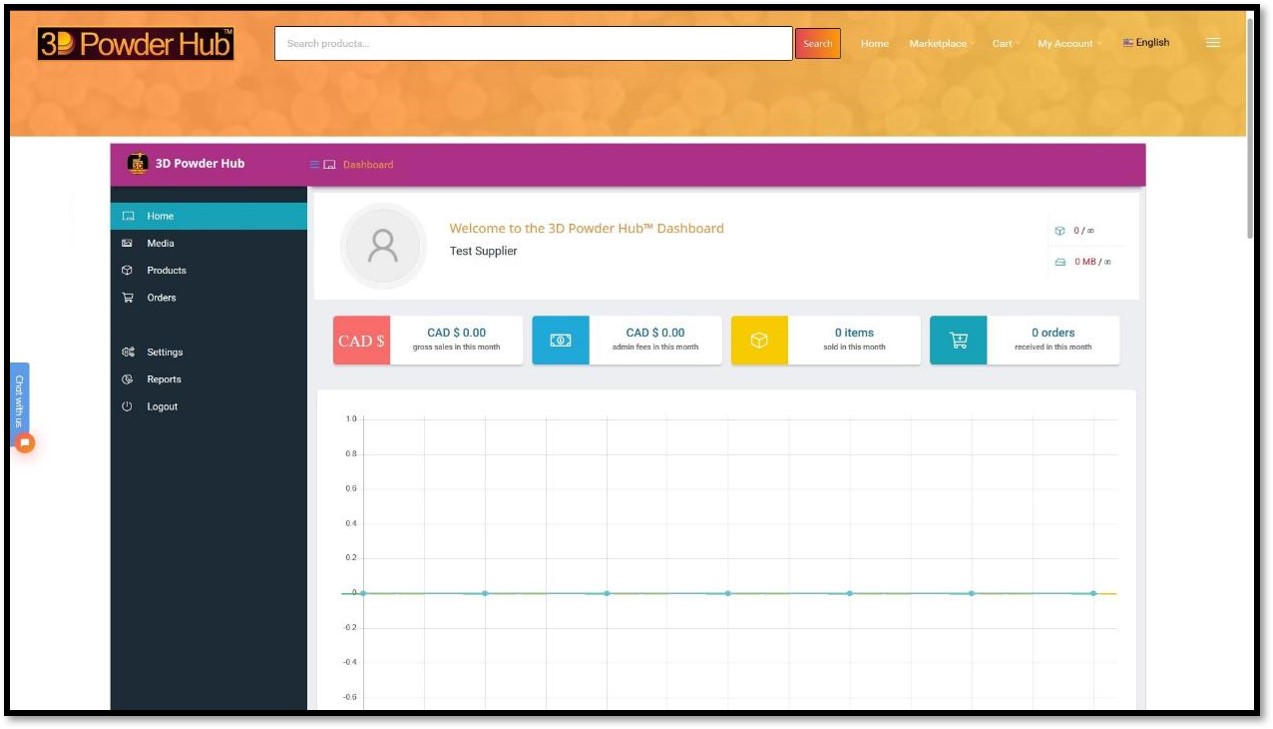
Once you log-in to our website, the My Account page is associated with your supplier and customer account. To access anything and everything related to your Supplier Account (this includes managing products, payments, orders, etc.) click the Store Manager tab on the My Account Page.
- Home: This is where you can see a quick overlook of statistics and general properties regarding your supplier account
- Media: This is where all your uploaded pictures (for products, store logo, etc.) will be stored. You can edit, delete and find links to them through this tab
- Products: This is where all your listed products will appear. You can add, edit or delete products from this panel
- Orders: This is where all the orders made for your listed product(s) by a customer will appear
- Settings: This is where all your store settings, including pay-out method, store name, contact information, and much more can be customized
- Reports: This is where you see more detailed statistics regarding your supplier account
Lookout and click this icon: . It’ll give you more details and hints if you forget something or need a refresher on a specific item.
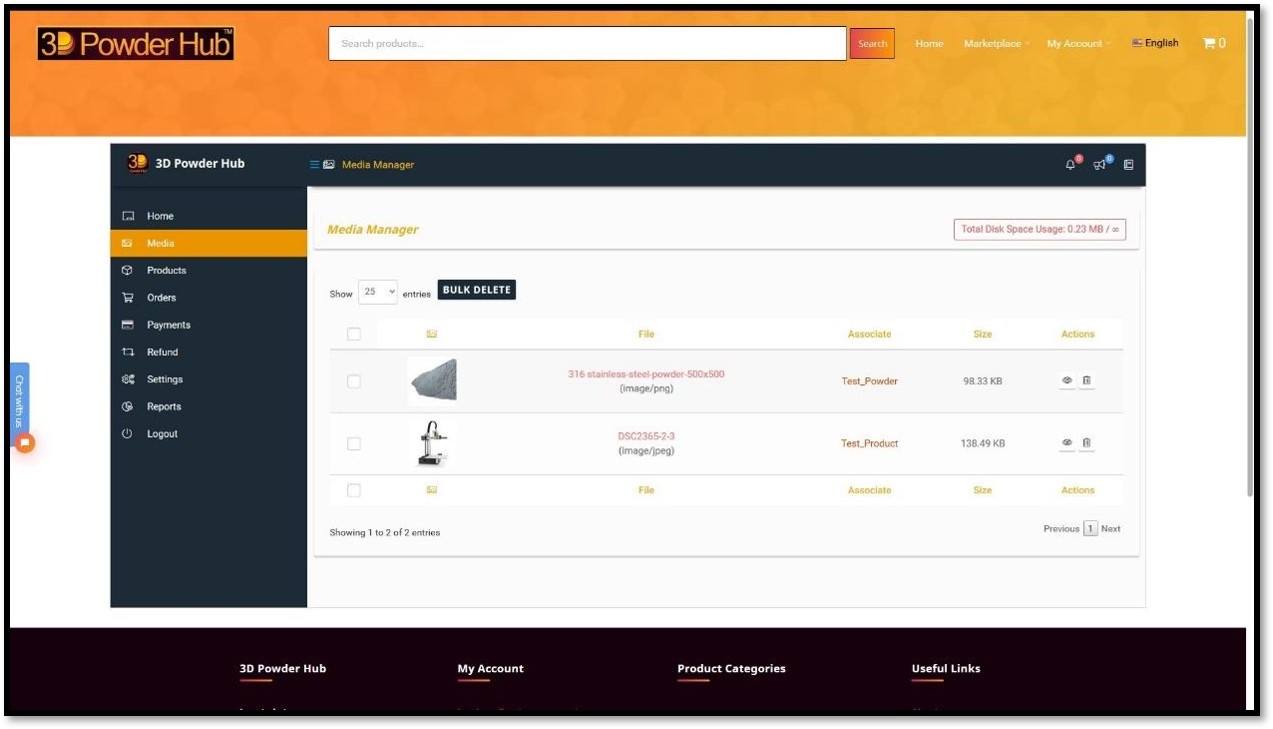
Media
The Media tab has a clean interface to allow you to view all the media files (images) that you have added to your library in a list form. Here you can edit or delete each image individually.
You can also delete images in bulk by checking off the checkbox to the left of each image and clicking Bulk Delete once you’ve made all the selection.
We recommend compressing your images before uploading them to allow better performance for your product pages and experience on the website.
Products
Please remember to save your work periodicly by pressing the Draft button, and after you finish, hit the Submit button to send us a review request. Any unsaved data will be lost if there is a problem in the internet connection, reloading of a page and/or any other occurance as such.
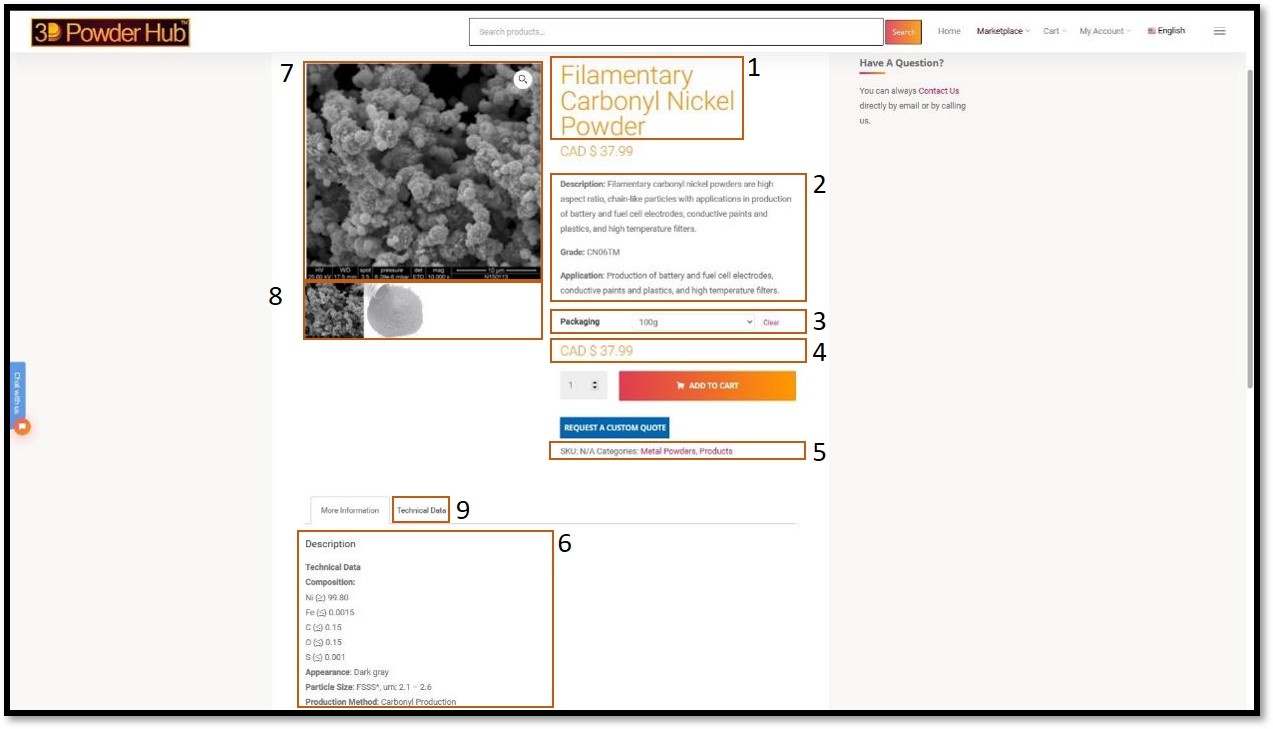
Below you’ll find a list of things as well as a corresponding labelled screenshot of a common product page with their appropriate names that can be used for refrence. These terms will help you throughout the entire product upload procedure.
- Product Title
- Short Description
- Variations
- Price
- Categories and Tags
- Description (More Information)
- Product Thumbnail
- Product Gallery
- Attributes (Technical Data)
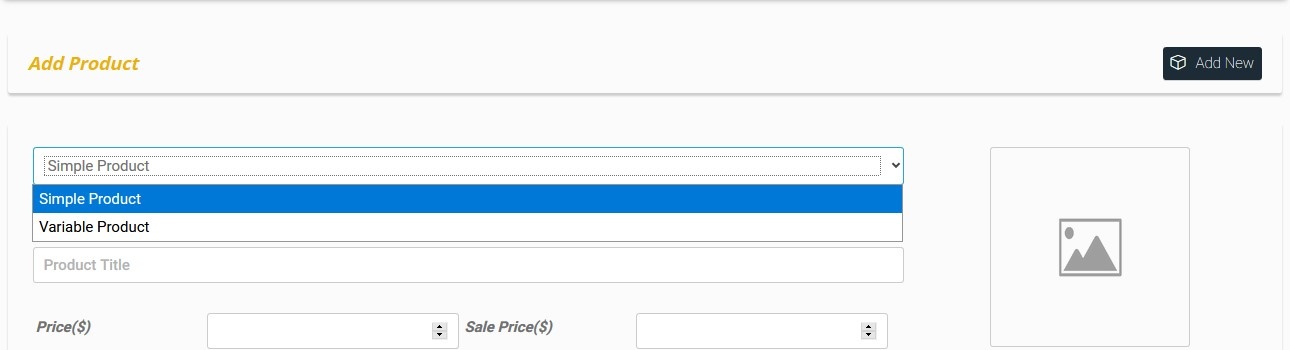
When you go to add a new product, you need to decide what type of a product it is:
- Simple Product: Simple products have one SKU, are shipped, and have no variations/options. For example, a book.
- Variable Product: Variable products can have multiple variations/options, each of which may have a different SKU or price. For example, a piece of clothing that is available in a variety of colors and sizes.
- Head on over to your Supplier Dashboard by clicking My Account > Store Manager
- Click on Products
- Click on Add New
You will now be presented with a new product page.
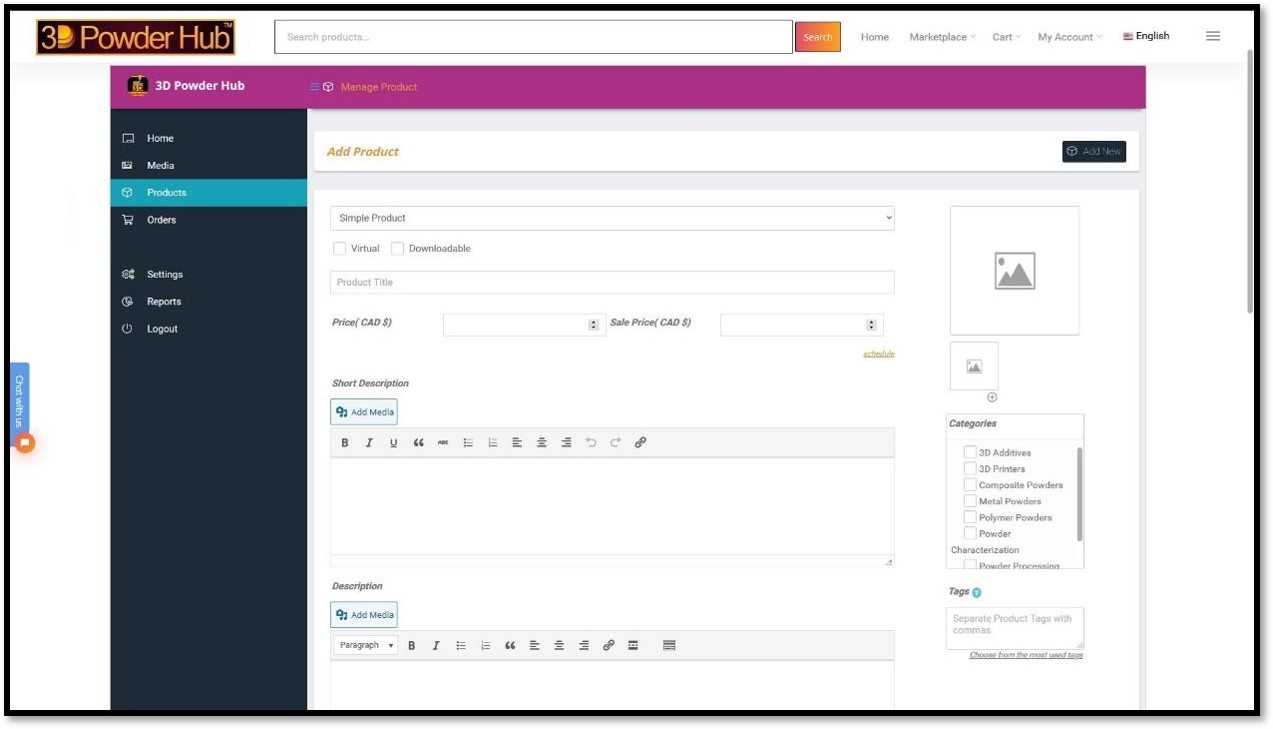
After a new product page appears, proceed to fill out all the necessary details including;
- Title: keep it less than a 100 characters and without any decorative characters.
- Price: in USD.
- Short Description: this will appear next to the product image. We recommend keeping this no longer than 2-3 sentences. Be sure to look at other products on the website for references.
- Product Thumbnail Image and Gallery: You can upload products that best represent your product. Please make sure the images are appropriate and that you have rights to all the images you use. Simply click the moutain icon and follow the onscreen direction. If you require a thorough guide, please check the Uploading a Product Image tab below.
- Description: is a more detailed overview of the product as well as specifications that you would like to share with the customers.
- Categories: check off the categories that the product best falls under.
- Tags: great for better search results, these are customizable and we recommend using keywords that best describe your product. You can also use words that are most commonly used to search for your product by doing a little research online.
Scroll down and continue to fill out the following information as required.
- Inventory:
- SKU
- Manage Stock: if checked, you will be able to add the exact quantity of the product that you have .ex, 5 3D Printers. Leave this unchecked if you would like to always show it as in stock/out of stock.
- Shipping: Add the weight, dimensions and processing time it takes for your item.
- Tax: Whether this item can have tax, or not. We recommend leaving this field untouched.
- Attributes: More commonly used for variable products. These attributes will appear under “Technical Data” on the product page. Can be used to add specific attributes like item color, material, etc.
- Linked:
- Up-sells: Up-sells are products which you recommend instead of the currently viewed product, for example, products that are more profitable or better quality or more expensive.
- Cross-sells: Cross-sells are products which you promote in the cart, based on the current product.
- Yoast SEO: to allow better search results
- Key phrase: words that might be used commonly for your product.
- Meta: you can duplicate your product description here.
- Head on over to your Supplier Dashboard by clicking My Account > Store Manager
- Click on Products
- Click on Add New
You will now be presented with a new product page. Change the product type to Variable.
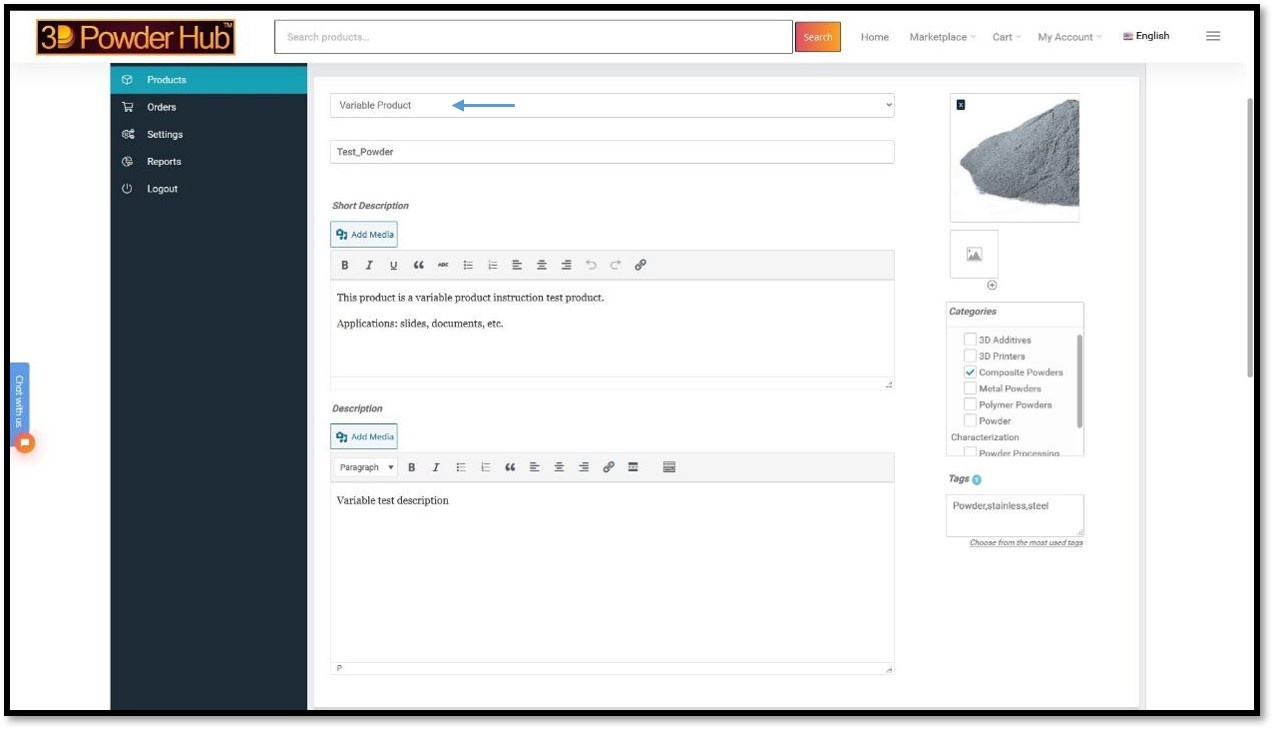
After a new product page appears, proceed to fill out all the necessary details including;
- Title: keep it less than a 100 characters and without any decorative characters.
- Short Description: this will appear next to the product image. We recommend keeping this no longer than 2-3 sentences. Be sure to look at other products on the website for references.
- Product Thumbnail Image and Gallery: You can upload products that best represent your product. Please make sure the images are appropriate and that you have rights to all the images you use. Simply click the moutain icon and follow the onscreen direction. If you require a thorough guide, please check the Uploading a Product Image tab below.
- Description: is a more detailed overview of the product as well as specifications that you would like to share with the customers.
- Categories: check off the categories that the product best falls under.
- Tags: great for better search results, these are customizable and we recommend using keywords that best describe your product. You can also use words that are most commonly used to search for your product by doing a little research online.
Scroll down and continue to fill out the following fields.
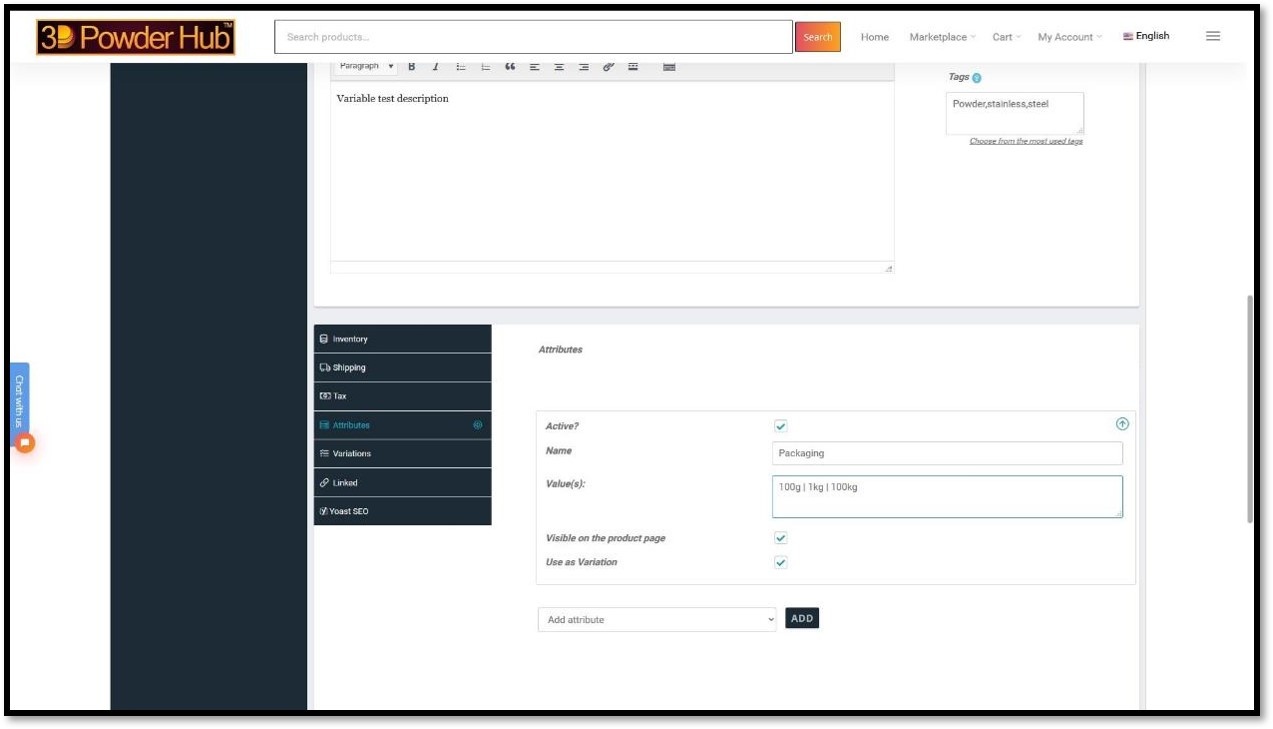
We will now make variations for our product using the Attributes tab.
- Click Attributes
- Click Add
- A new set of fields will pop up, fill them according to your preference
- For example, we are going to make different amounts of the same product;
- Naming the field “Packaging”
- The values (variations that the customer will see) as 100g, 1kg, and 10kg. Seperate them using |
- Make sure to check, Active, Visible on the product page and Use as Variation
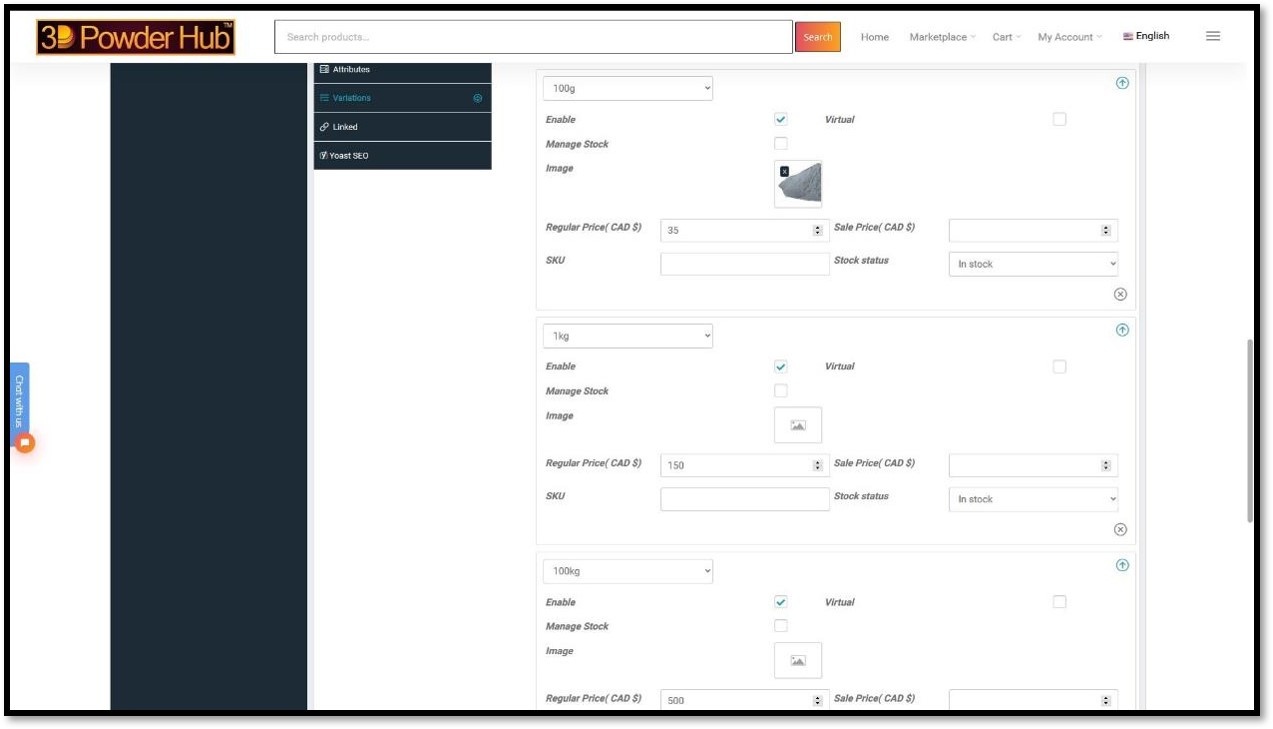
Editing the individual variation properties.
- Click on Variations (give the website a few moments to load the variations
- Click the icon to add more tabs, one for each variation you have (in our case, 3)
- Lastly, click the blue arrows to expand each variation, and edit each variation’s properties separately, including;
- Price: in USD.
- SKU: each variation can have a different SKU.
- Manage Stock/ Stock Status: if checked, you will be able to add the exact quantity of the product that you have .ex, 5 3D Printers. Leave this unchecked if you would like to always show it as in stock/out of stock.
- Add the weight, dimensions and processing time it takes for your item
- Image(you do not have to assign a picture for each variation, but you can if you wish to)
- To delete a variation, click the icon on that specific variation tab
- Linked:
- Up-sells: Up-sells are products which you recommend instead of the currently viewed product, for example, products that are more profitable or better quality or more expensive.
- Cross-sells: Cross-sells are products which you promote in the cart, based on the current product.
- Yoast SEO: to allow better search results
- Key phrase: words that might be used commonly for your product.
- Meta: you can duplicate your product description here.
To manage all your products (view, edit, delete, or archive), head on over to the Products tab through My Account > Store Manager > Products
You will now be presented with a products panel.
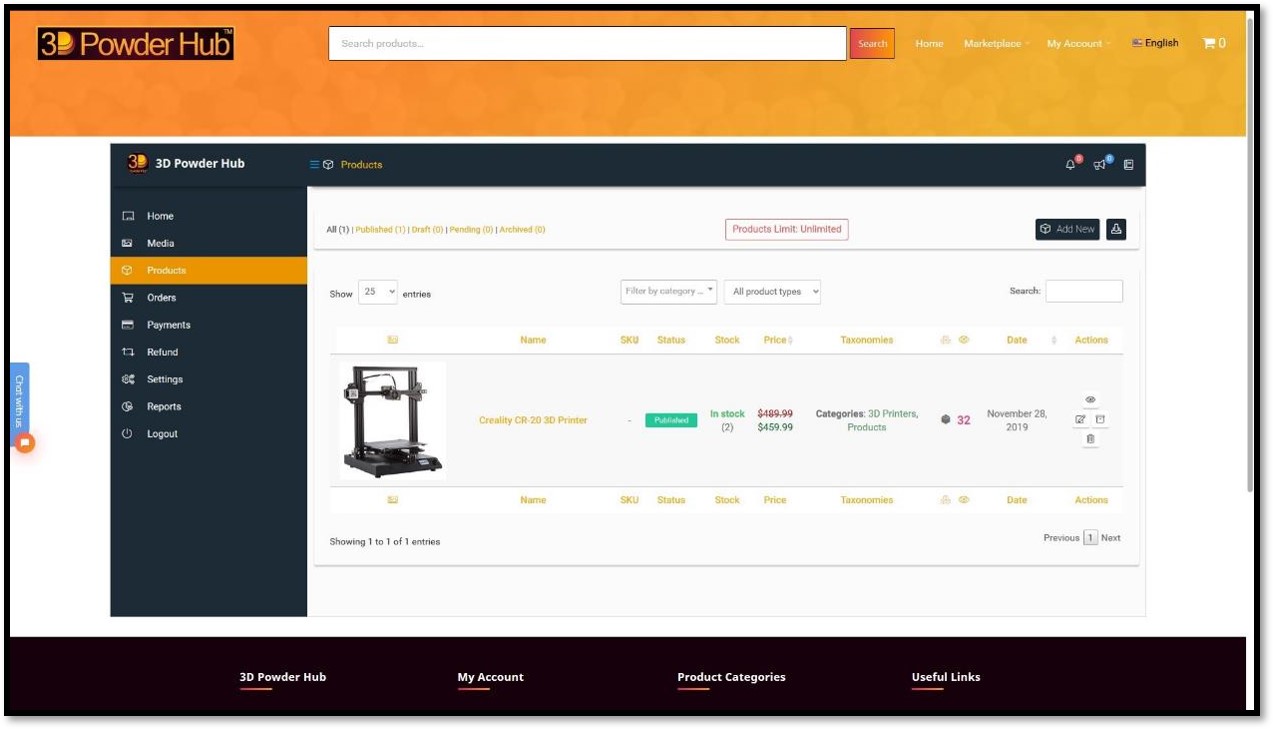
As you can see, the products panel will include;
- Product Thumbnail
- Name
- SKU
- Status
- Stock
- Price and Sale Price
- Categories
- Page Views
- Date Uploaded
- Actions
- Sorting Options
- Add a New Product
This products panel can be used to sort your products in many ways. Published, Drafts, Archived, sort them through categories, search within your own catalogue, as well as download the CSV file full of information about your products.
From the Actions menu you can either view, edit, archive and delete the item(s) in a quick and easy manner.
![]()
- Eye: View product page.
- Pencil: Edit product page.
- File Box: Archive (remove from website but keep a copy of it on the database).
- Trash: Permanently delete the product.
Orders
When you click on Orders from you Store Manager dashboard, you’ll be present with a list of all the orders that have been made for your product listings.
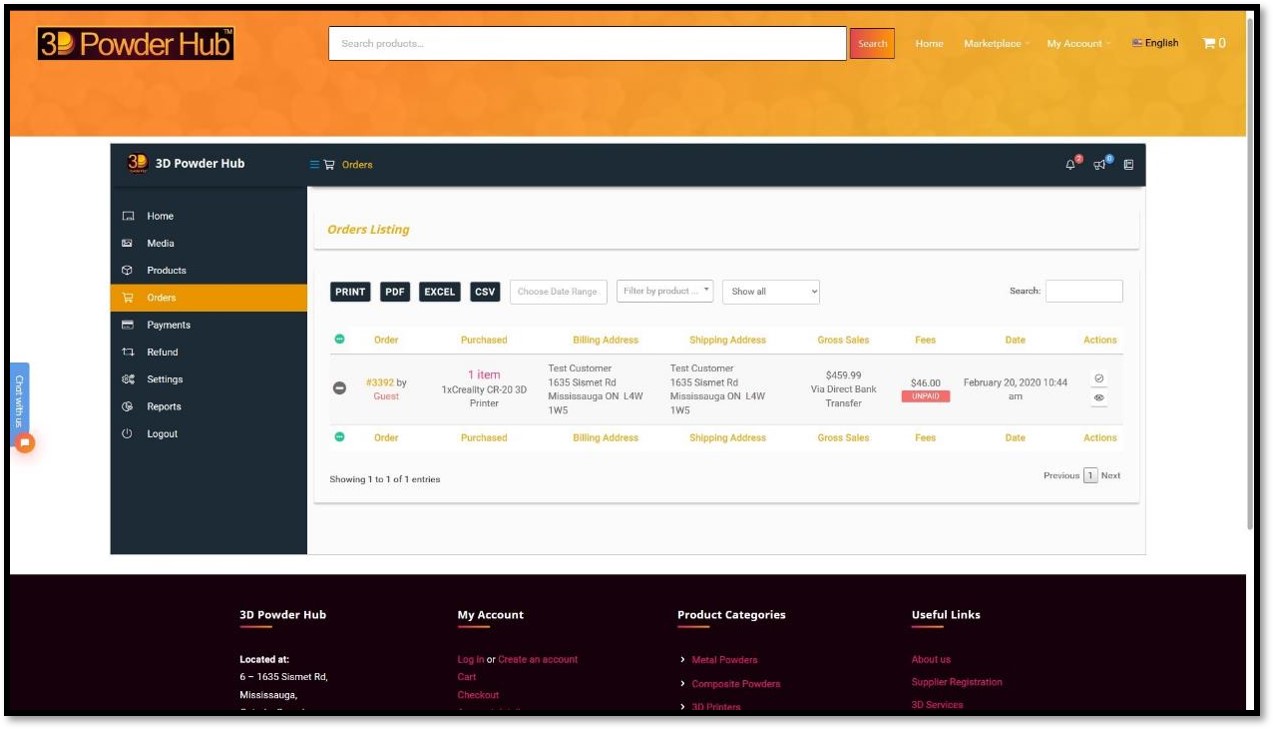
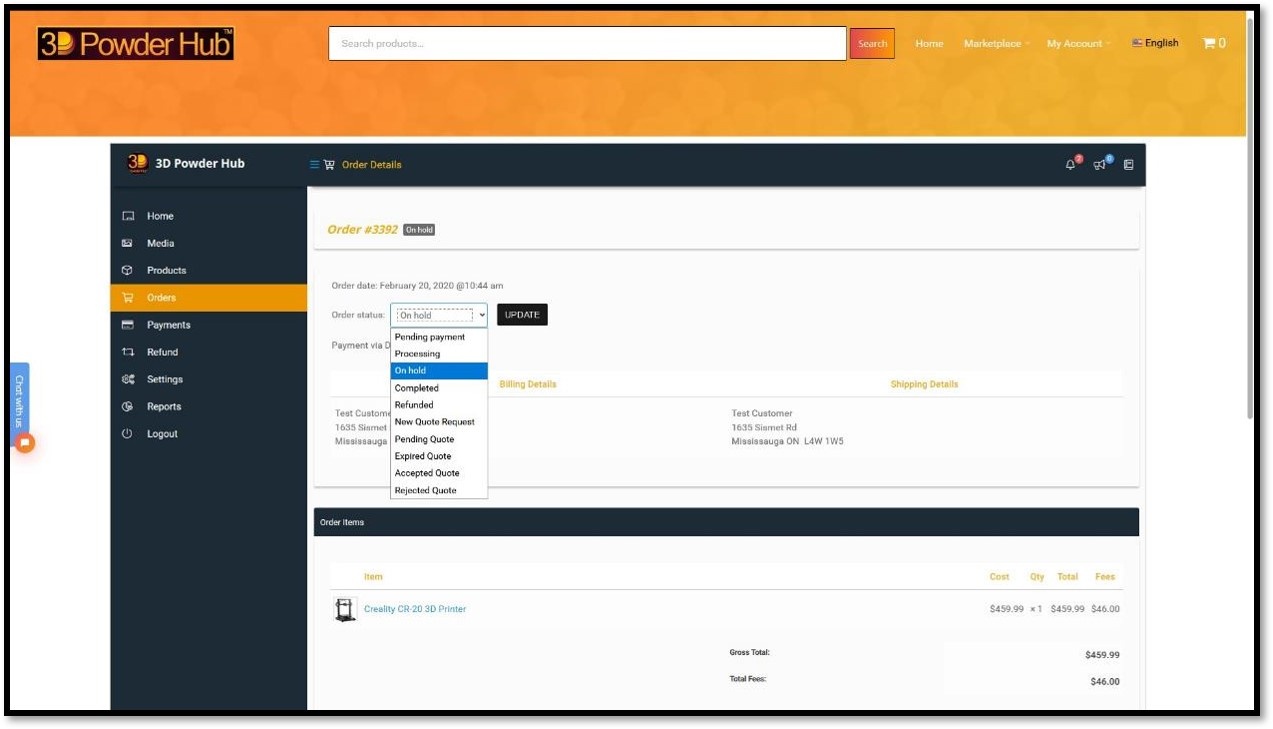
To view more details of a single order, you can simply click the order number (#xyz) for the order or the eyeball icon.
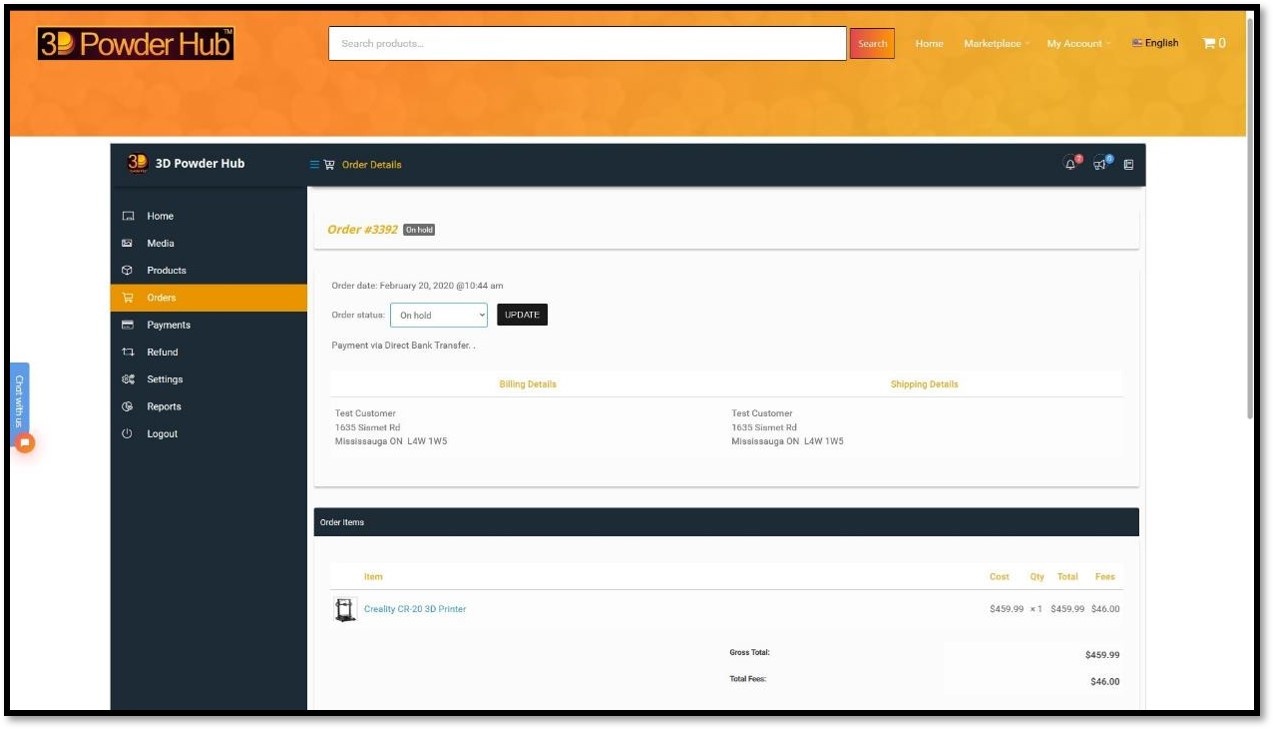
You’ll now be presented with a page full of details such as Order Date, Billing Details, Shipping Details, the Payment method used, Order Items, ans Order Notes from the customer. You will also be able to manage the Order Status as you go along fulfilling the order.
Once you’re on a single order page, you’ll have the option to select the Order Status. Here’s a description for each option you can select to keep yourself organized and keep the customer up-to date on their order.
- Pending Payment: The customer has yet to have their amount cleared.
- Processing: The payment has been recieved and the order is being prepared to be shipped.
- On Hold: Can be due to any reason, payment issue, out of stock, misinformation regarding something.
- Completed: The order has been shipped out. This will also send the customer an emial informing them about their order being on the way.
- Refunded: When an order amount has been refunded succefully.
- New Quote Request: This will be the intial order status if a customer puts in a quote request.
- Pending Quote: This will automatically be applied when a quote offer has been sent to the customer.
- Expired Quote: This will automatically be applied after 15 days have passed since the quote offer has been sent with no reply from the customer.
- Accepted Quote: This will automatically be applied after the customer accepts the quote offer and proceeds to make an order (A new order will be made automatically).
- Rejected Quote: This will automatically be applied after the customer rejects the quote offer.
Settings
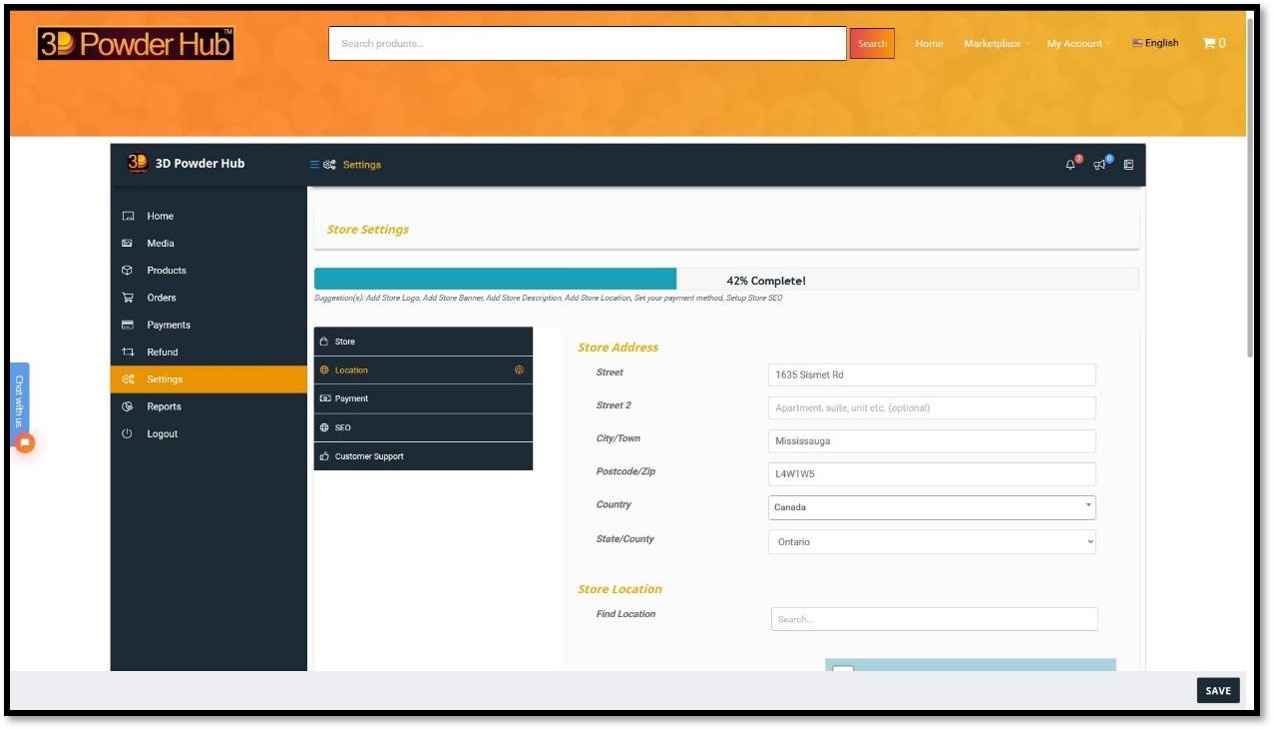
You can access your account settings by heading over to the Store Manager Dashboard and clicking Settings. Each sub-menu contains a different set of configurable items. Please make sure you set up everything in order to make the process between you and us, that is the Supplier and 3D Powder Hub™ easy and fluent. Please note, this information is important, as it is the information that we, at 3D Powder Hub™, will use to contact you, disperse money, etc. in the event we need to. Therefore, please make sure the information here is accurate and up-to date.
You’ll be able to see a progress bar along the top to help you determine which things are left to do for your personal store.
The Store submenu is where you can update your supplier information, contact information, and etc.(You can also configure your store logo, header image and etc. but this is optional.)

The Location submenu is where you can configure the store address from where you operate.
The Payment submenu is where you can set up your bank account or paypal information for how you would like to collect your revenue. It is not our resposibilty if a withdrawl amount is lost due to the information being incorrect.

The SEO submenu (Search Engine Optimization) is to help you and our website get better search results not onlt across the web but also for our personal store search results. [Optional]
- SEO Title: You can use your store name, titl, anything that you feel best suites you.
- Meta Desciption: A description of the products you will be most focused on selling.
- Meta Keywords: These are words that are might be most commonly used for the products you are selling.
- Facebook: You can input your professional facebook profile information here If you would like.
- Twitter: You can input your professional twitter profile information here If you would like.

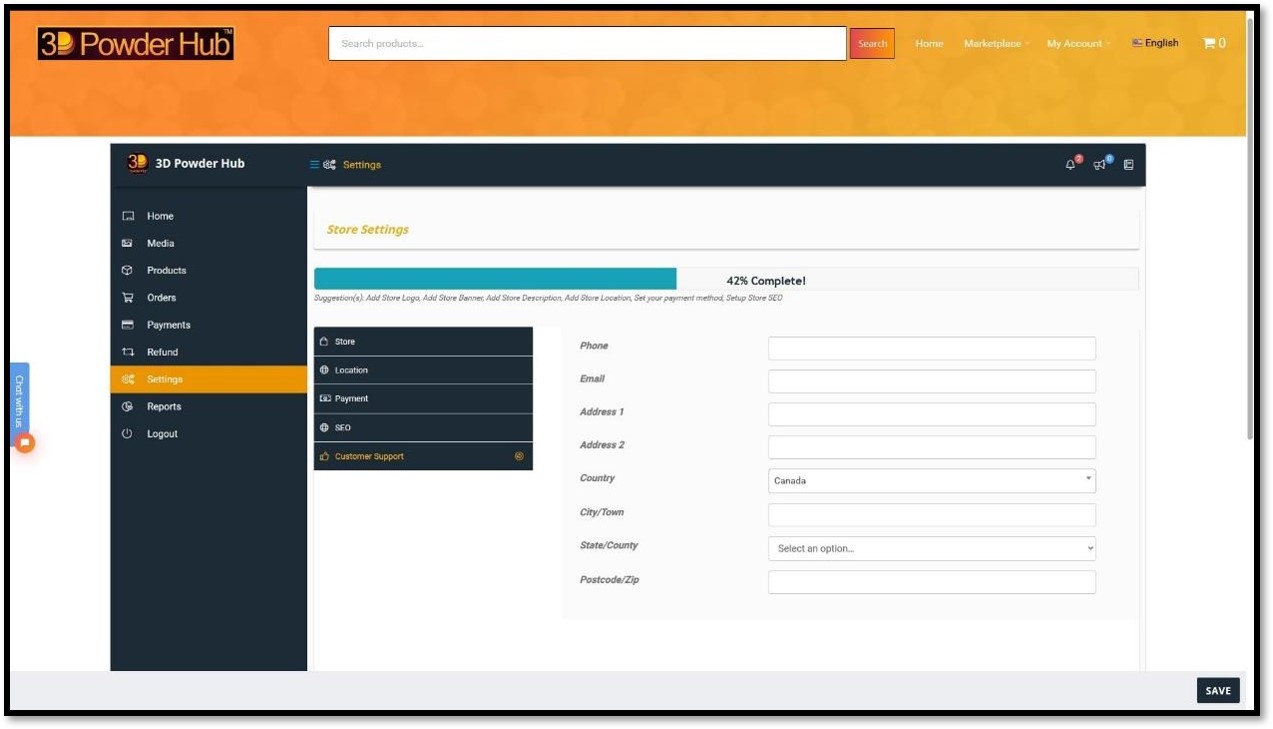
The Customer Support submenu is for future implementations on our website. You can input your information that we or the customers can use to contact you though a direct messaging system on our platform. Therefore, as of right now, this submenu is optional. If it is not visible to you, you can ignore this section entirely.
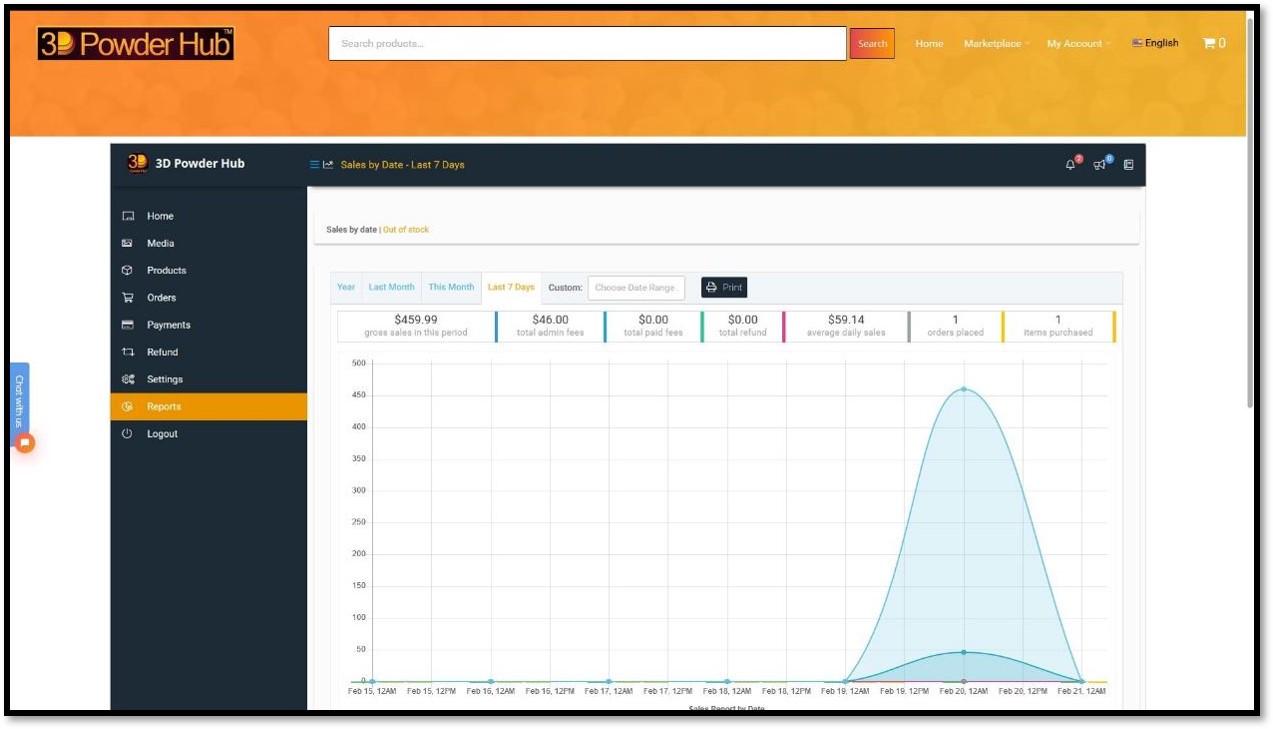
Reports
You can access your sales reports by heading over to the Store Manager dashboard and clicking Reports. Here you can view the gross sales amount, admin fees, refunds, orders placed and more. You can change the time period for the reports by using the bar along the top of the graph itself.